
As a penetration tester, you will be spending most of your time working in the Linux terminal, as a result, it is vitally important to know how to set up your terminal to be as efficient as possible so as to improve your efficiency and workflow.
In this case, we will be taking a look at how to set up your terminal for use during penetration tests and other engagements, this process will involve the use of various terminal emulators, multiplexers, ZSH, and several plugins that will provide you with useful aliases that will speed up and improve your efficiency.
Tools we will be using
- Terminator - Terminator is an open-source terminal emulator programmed in Java. It is available on Microsoft Windows, macOS, Linux, and other Unix systems that use the X Window System.
- Tmux - tmux is an open-source terminal multiplexer for Unix-like operating systems. It allows multiple terminal sessions to be accessed simultaneously in a single window.
- ZSH - The Z shell is a Unix shell that can be used as an interactive login shell and as a command interpreter for shell scripting.
- oh my zsh - Oh My Zsh is a delightful, open-source, community-driven framework for managing your Zsh configuration.
My environment
The techniques and tools outlined and used in this post were performed on Kali Linux. With the exception of package managers and package names, the techniques are applicable to all Linux distributions regardless of their use case.
Setting up Terminator
The first step will involve setting up our terminal of choice, in this case, we will be utilizing Terminator, Terminator offers great functionality and customization as opposed to other terminal emulators.
You can install Terminator on Linux by running the following command:
sudo apt-get install terminator -y
After installing Terminator, you should familiarise yourself with the keybindings and customize the look and feel of your terminal.
One of the great features of Terminator is the ability to split your terminal either horizontally or vertically, this can be done by right-clicking on your terminal and specifying the type of split you want.
Alternatively, you can also split your terminal by utilizing the following keybindings:
- CTRL+SHIFT+O - Horizontal Split
- CTRL+SHIFT+E - Vertical Split
As shown in the preceding screenshot, you will now be able to split your terminal both vertically and horizontally, consequently improving your efficiency.
Note: Splitting your terminal is not the same as opening a new terminal tab.
Setting up tmux
tmux is a terminal multiplexer for Unix-like operating systems and allows multiple terminal sessions to be opened and accessed simultaneously in a single window. It can be used to run more than one command-line program at the same time.
You can install tmux on Linux by running the following command:
sudo apt-get install tmux -y
After installing tmux, you can launch it by running the following command in your terminal:
tmux
This will initiate tmux and your terminal should have a green bar at the bottom indicating your terminal sessions and their corresponding numbers. Whenever you start tmux, you will only have one terminal session with the number 0.
You can launch a new session through the use of the following keybinding:
- CTRL+B & C
This will create a new session with the corresponding identifier, tmux numbers sessions from 0 as a result, if you create a new session it will be numbered 1.
You can switch to other terminal sessions by utilizing the following keybinding:
- CTRL+B & SESSION-NUMBER
You can learn more about how to use tmux in the following video tutorial we published.

tmux can be used to organize your workflow and provides you with an efficient way of creating and managing your terminal sessions instead of creating and switching between terminal tabs.
Installing ZSH
The Z shell is a Unix shell that can be used as an interactive login shell and as a command interpreter for shell scripting.
The reason we are utilizing ZSH is primarily because it offers vastly more in terms of functionality, aliases, and plugins as opposed to other shells.
By default, Kali Linux and other Linux distributions utilize BASH as the shell of choice, in order to switch from BASH to ZSH, you will need to install ZSH. This can be done by running the following command:
sudo apt-get install zsh -y
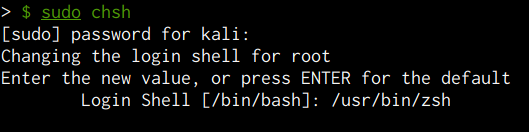
After installing ZSH, you will need to switch the default shell for your current user, this can be done by using the chsh (Change Shell) utility as follows:
sudo chsh
This will prompt you to specify the new shell for your current user, in this case, you will need to specify /usr/bin/zsh as shown in the following screenshot.
After specifying ZSH as your default shell, you will need to reboot your system for the changes to be applied.
The next step will involve setting up oh my zsh to manage and theme ZSH.
Setting up and configuring oh-my-zsh
Oh My Zsh is an open-source, community-driven framework for managing your Zsh configuration. It comes bundled with thousands of helpful functions, helpers, plugins, and themes.
Website: https://ohmyz.sh/
We will be using oh my zsh to set up our shell prompt, install useful pentesting plugins and improve our efficiency.
You can install oh-my-zsh by running the following command in your terminal:
sh -c “$(wget https://raw.github.com/ohmyzsh/ohmyzsh/master/tools/install.sh -O -)”
This will install and set up the oh my zsh framework on your system. After it has been installed, you can modify your ZSH configuration file stored in your user’s home directory:
vim ~/.zshrc
This configuration file allows you to specify your theme, plugins, or any aliases you wish to add.
oh-my-zsh themes
You can select the oh-my-zsh theme you want to use from the following repository: Themes · ohmyzsh/ohmyzsh Wiki · GitHub
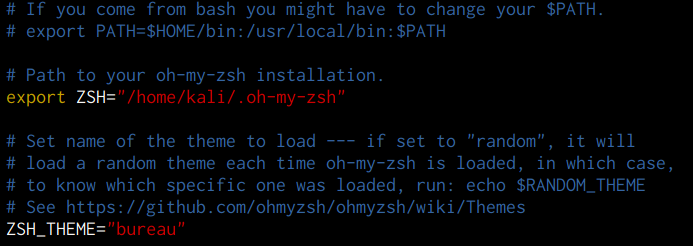
After selecting a theme, you can specify the name of the theme in the ZSH configuration file as shown in the following screenshot.
oh-my-zsh plugins
You can select the oh-my-zsh plugins you want to use from the following repository: Plugins · ohmyzsh/ohmyzsh Wiki · GitHub
After selecting the plugin you wish to install, run the plugin installation command for oh-my-zsh and specify the name of the plugin in the ZSH configuration file as shown in the following screenshot.

oh-my-zsh aliases
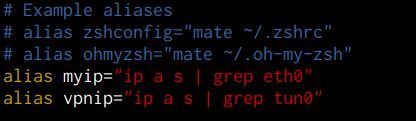
Oh my zsh also provides you with the ability to create command aliases to improve your efficiency, this can be done by adding your aliases to the ZSH configuration file as shown in the following screenshot.
oh-my-zsh pentesting plugins
In addition to the useful plugins that you can set up and use with oh-my-zsh, there are various helpful plugins that can improve your efficiency during a penetration test or security engagement.
The following is a list of plugins that use on a regular basis:
- Nmap plugin: https://github.com/ohmyzsh/ohmyzsh/tree/master/plugins/nmap
- oh-my-zsh pentest plugin: GitHub - jhwohlgemuth/zsh-pentest: Aliases and functions for the lazy penetration tester
- Quiver plugin: GitHub - stevemcilwain/quiver: Quiver is the tool to manage all of your tools for bug bounty hunting and penetration testing.
oh-my-zsh Nmap plugin
This plugin adds some useful aliases for Nmap similar to the profiles in zenmap.
Installation instructions for the plugin are highlighted in the companion video for this post.
GitHub Repo: https://github.com/ohmyzsh/ohmyzsh/tree/master/plugins/nmap
To use it, add nmap to the plugins array in your zshrc file:
plugins=(… nmap)
The following is a list of aliases that this plugin provides:
nmap_open_ports: scan for open ports on the target.nmap_list_interfaces: list all network interfaces on the host where the command runs.nmap_slow: slow-scan that avoids spamming the target’s logs.nmap_fin: scan to see if hosts are up with TCP FIN scan.nmap_full: aggressive full scan that scans all ports, tries to determine OS and service versions.nmap_check_for_firewall: TCP ACK scan to check for firewall existence.nmap_ping_through_firewall: host discovery with SYN and ACK probes instead of just pings to avoid firewall restrictions.nmap_fast: fast scan of the top 300 popular ports.nmap_detect_versions: detects versions of services and OS, runs on all ports.nmap_check_for_vulns: uses vulnscan script to check target services for vulnerabilities.nmap_full_udp: same as full but via UDP.nmap_traceroute: try to traceroute using the most common ports.nmap_full_with_scripts: same as nmap_full but also runs all the scripts.nmap_web_safe_osscan: little “safer” scan for OS version as connecting to only HTTP and HTTPS ports doesn’t look so attacking.nmap_ping_scan: ICMP scan for active hosts.
You can use the aliases provided by this plugin to improve your efficiency when running Nmap scans.
oh-my-zsh Pentest plugin
This plugin provides aliases and functions for the lazy penetration tester.
This plugin can be installed by running the following command in your terminal:
git clone GitHub - jhwohlgemuth/zsh-pentest: Aliases and functions for the lazy penetration tester ${ZSH_CUSTOM:-~/.oh-my-zsh/custom}/plugins/zsh-pentest
After installing the plugin, you will need to add zsh-pentest to the plugins array in your .zshrc file:
plugins=(… zsh-pentest)
Aliases
| Alias | Command |
|---|---|
| me | `echo $(ifconfig eth0 |
| cme | crackmapexec |
| e4l | enum4linux -a |
| h2t | html2text -style pretty |
| oso | onesixtyone |
Functions
| Name | Command | Tested |
|---|---|---|
create_scan_directory |
Create a directory for saving results | yes |
enum_snmp $IP [WORDLIST] [NETWORK] |
Create host list and scan IP with WORDLIST | yes |
enum_web $IP [PORT] [WORDLIST] |
Enumerate IP with whatweb and nikto |
yes |
flush_iptables |
You guessed it…this flushes iptables |
yes |
focus [IP] [PORT] |
Set RHOST=IP and RPORT=PORT | yes |
get_gateway |
Get router IP address | yes |
get_hosts [PORT] |
Get the list of host IP addresses found via nmap |
yes |
get_hostnames $IP |
Get the list of hostnames using nmap and the IP of a known DNS server |
yes |
htm [IP] |
Download IP and print with html2text |
yes |
monitor_traffic [$IP] |
Monitor bytes over the line with iptables |
yes |
scan_tcp $IP |
Scan IP with onetwopunchmasscan |
yes |
serve [PORT] |
Start Python server in the current directory on PORT [default: 80] | yes |
sort_ips ADDRESSES |
Sort list of IP addresses | yes |
oh-my-zsh Quiver plugin
Quiver is an organized namespace of shell functions that pre-fill commands in your terminal so that you can ditch your reliance on notes, copying, pasting, editing, copying, and pasting again. Quiver helps you remember how to use every tool in your arsenal and doesn’t hide them behind scripting that can be cumbersome to maintain or update. Instead, you can use Quiver to build a composable, on-the-fly workflow for every situation.
Features
- Prefills the commands within a terminal
- Well-organized commands with tab auto-completion
- Installs as a ZSH / Oh-My-ZSH shell plugin
- Customizable settings, Global variables
- Recon phase commands for OSINT
- Enumeration of common services
- Web enumeration, brute-forcing, and hacking
- Exploit compilation helpers
- Reverse shell handlers
- Content serving commands
- Built-in logbook for on-the-fly notes, saving commands
- Render markdown notes to the command line
- Kali Linux system management
- Update notification and install
- Installers for dependencies
Quiver has the following requirements:
- ZSH (apt-get install zsh)
- oh-my-zsh (optional requirement but recommended: https://ohmyz.sh/)
- Kali Linux (https://kali.org)
You can install the quiver plugin by running the following command:
git clone GitHub - stevemcilwain/quiver: Quiver is the tool to manage all of your tools for bug bounty hunting and penetration testing. ~/.oh-my-zsh/custom/plugins/quiver
Edit ~/.zshrc to load the plugin.
plugins=(git quiver)
Quiver organizes commands into namespaces starting with qq-, such as qq-enum-web or qq-recon-domains. To see an overview of all namespaces simply use qq-help. Each namespace also has it’s own help command, such as qq-enum-web-help that provides a listing of available commands. All commands support tab completion and search.
Every namespace was a qq–install command that will install all of the tools relevant to that namespace. You can install just the tools you need, or use qq-install-all to run the installers of all namespaces.
Quiver is meant to provide a composable, on-the-fly workflow. It replaces the common painful raw workflow of reading your notes, finding a command, copy, paste, replace the values with target values, copy, paste, run. Some rely heavily on completely automated scripts or frameworks that run all the commands for a workflow and output well-formatted data. While these scripts are great for many use cases, they can often be brittle, hide the underlying tools and techniques, and be cumbersome to modify. Instead, Quiver gives you a happy medium, you can run commands quickly and easily with well-organized output, composing your workflow as you go depending on the targets and context.
The usage instructions for this plugin have been covered in the companion video to this blog post.