Foreword
The moment you leave your laptop, say in a hotel room, you can no longer trust your system as it could have been modified while you were away. Think you are safe because you have a crypted disk? Well, if the boot partition is on the laptop itself, it can be manipulated and you will not notice because the boot partition can’t be encrypted. The BIOS needs to access the MBR and boot loader and that loads the Linux kernel, all unencrypted. There has been some reports lately that the Linux cryptsetup is insecure because you can spawn a root shell by hitting the enter key for 70 seconds. This is not the real threat to your system, really. If someone has physical access to your hardware, he can get a root shell in less than a second by passing init=/bin/bash as parameter to the Linux kernel in the boot loader regardless if cryptsetup is used or not! The attacker can also use other ways like booting a live system from CD/USB etc. The real insecurity here is the unencrypted boot partition and not some script that gets executed from it. So how to prevent this physical access attack vector? Just keep reading this guide.
This guide explains how to install Debian securely on your laptop with using an external USB boot disk, such as a standard USB memory stick. The disk inside the laptop should not contain your /boot partition since that is an easy target for manipulation. An attacker could for example change the boot scripts inside the initrd image to capture your passphrase of your crypted volume. With an USB boot partition, you can unplug the USB stick after the operating system has booted. Best practice here is to have the USB stick together with your bunch of keys. That way you will disconnect your USB stick early after the boot as finished so you can put it back into your pocket.
Secure Hardware Assumptions
We have to assume here that the hardware you are using to download and verify the install media is safe to use. Same applies with the hardware where you are doing the fresh Debian install. Say the hardware does not contain any malware in the form of code in EFI or other manipulation attempts that influence the behavior of the operating system we are going to install.
Download Debian Install ISO
Feel free to use any Debian mirror and install flavor. For this guide I am using the download mirror in Germany and the DVD install flavor.
“REMEMBER GUY’S GET AN UPDATED ISO!!!”
wget http://ftp.de.debian.org/debian-cd/current/amd64/iso-dvd/debian-8.6.0-amd64-DVD-1.iso
Verify hashsum of ISO file
To know if the ISO file was downloaded without modification we have to check the hashsum of the file. The hashsum file can be found in the same directory as the ISO file on the download mirror. With hashsums if a single bit differs in the file, the resulting SHA512 sum will be completely different.
Obtain the hashsum file using:
wget http://ftp.de.debian.org/debian-cd/current/amd64/iso-dvd/SHA512SUMS
Calculate a local hashsum from the downloaded ISO file:
sha512sum debian-8.6.0-amd64-DVD-1.iso
Now you need to compare the hashsum with that is in the SHA512SUMS file. Since the SHA512SUMS file contains the hashsums of all files that are in the same directory you need to find the right one first. grep can do this for you:
grep debian-8.6.0-amd64-DVD-1.iso SHA512SUMS
Both commands executed after each other should show following output:
$ sha512sum debian-8.6.0-amd64-DVD-1.iso
c3883edfc95e3b09152d46ce29a032eed1de71531549aee86bb98dab1528088a16f0b4d628aee8ac6cc420364e208d3d5e19d0dea3576f53b904c18e8f604d8c  debian-8.6.0-amd64-DVD-1.iso
$ grep debian-8.6.0-amd64-DVD-1.iso SHA512SUMS
c3883edfc95e3b09152d46ce29a032eed1de71531549aee86bb98dab1528088a16f0b4d628aee8ac6cc420364e208d3d5e19d0dea3576f53b904c18e8f604d8c  debian-8.6.0-amd64-DVD-1.iso
As you can see the hashsum found in the SHA512SUMS file matches with the locally generated hashsum using the sha512sum command.
At this point we are not finished yet. These 2 matching hashsums just means whatever was on the download server matches what we have received and stored locally on your disk. The ISO file and SHA512SUM file could still be a modified version!
And this is where GPG signatures chime in, covered in the next section.
Download GPG Signature File
GPG signature files usually have the .sign file name extension but could also be named .asc . Download the signature file using wget:
wget http://ftp.de.debian.org/debian-cd/current/amd64/iso-dvd/SHA512SUMS.sign
Obtain GPG Key of Signer
Letting gpg verify the signature will fail at this point as we don’t have the public key of the signer:
$ gpg --verify SHA512SUMS.sign
gpg: assuming signed data in 'SHA512SUMS'
gpg: Signature made Mon 19 Sep 2016 12:23:47 AM HKT
gpg:                using RSA key DA87E80D6294BE9B
gpg: Can't check signature: No public key
Downloading a key is trivial with gpg, but more importantly we need to verify that this key (DA87E80D6294BE9B) is trustworthy, as it could also be a key of the infamous man-in-the-middle.
Here you can find the GPG fingerprints of the official signing keys used by Debian. The ending of the “Key fingerprint” line should match the key id we found in the signature file from above.
gpg:                using RSA key DA87E80D6294BE9B

Key fingerprint = DF9B 9C49 EAA9 2984 3258  9D76 DA87 E80D 6294 BE9B
DA87E80D6294BE9B matches Key fingerprint = DF9B 9C49 EAA9 2984 3258 9D76 DA87 E80D 6294 BE9B
To download and import this key run:
$ gpg --keyserver keyring.debian.org --recv-keys DA87E80D6294BE9B
Verify GPG Signature of Hashsum File
Ok, we are almost there. Now we can run the command which checks if the signature of the hashsum file we have, was not modified by anyone and matches what Debian has generated and signed.
gpg: assuming signed data in 'SHA512SUMS'
gpg: Signature made Mon 19 Sep 2016 12:23:47 AM HKT
gpg:                using RSA key DA87E80D6294BE9B
gpg: checking the trustdb
gpg: marginals needed: 3  completes needed: 1  trust model: pgp
gpg: depth: 0  valid:   1  signed:   0  trust: 0-, 0q, 0n, 0m, 0f, 1u
gpg: Good signature from "Debian CD signing key <[email protected]>" [unknown]
gpg: WARNING: This key is not certified with a trusted signature!
gpg:          There is no indication that the signature belongs to the owner.
Primary key fingerprint: DF9B 9C49 EAA9 2984 3258  9D76 DA87 E80D 6294 BE9B
The important line in this output is the “Good signature from …” one. It still shows a warning since we never certified (signed) that Debian key. This can be ignored at this point though.
Write ISO Image to Install Media
With a verified pristine ISO file we can finally start the install by writing it to an USB stick or blank DVD. So use your favorite tool to write the ISO to your install media and boot from it. I have used dd and a USB stick attached as /dev/sdb.
dd if=debian-8.6.0-amd64-DVD-1.iso of=/dev/sdb bs=1M oflag=sync
Install Debian on Crypted Volume with USB boot partition
I am not explaining each step of the Debian install here. The Debian handbook is a good resource for covering each install step.
Follow the steps until the installers wants to partition your disk.

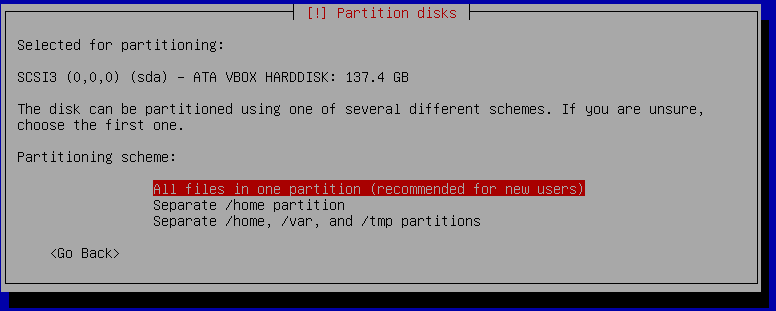
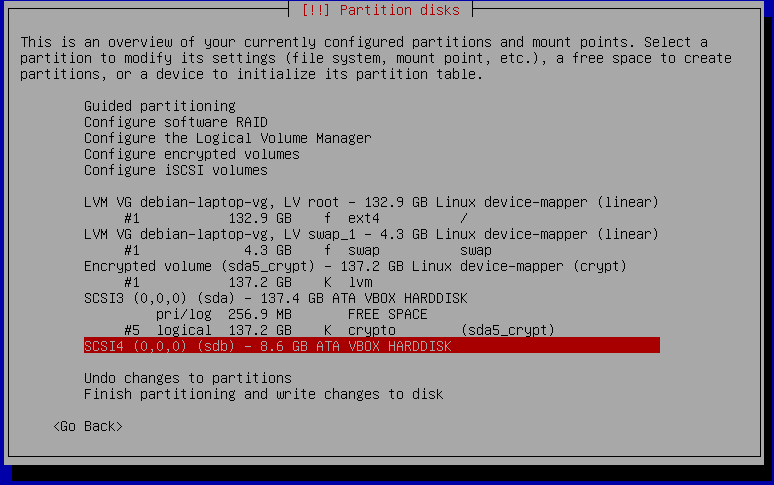
There you need to select the “Guided, use entire disk and set up encrypted LVM” option. After that select the built-in disk of your laptop, which usually is sda but double check this before you go ahead, as it will overwrite the data! The 137 GB disk in this case is the built-in disk and the 8 GB is the USB stick.

It makes no difference at this point if you select “All files in one partition” or “Separate /home partition”. The USB boot partition can be selected a later step.
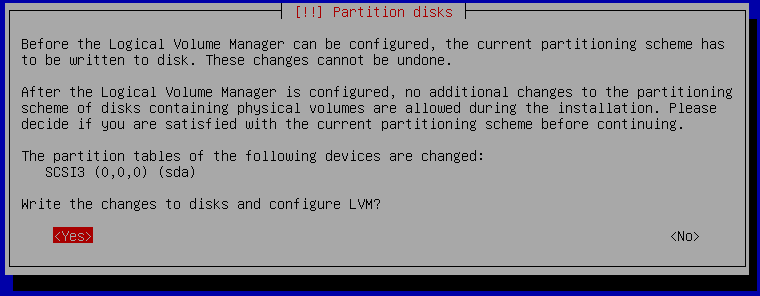
Confirm that you want to overwrite your built-in disk shown as sda. It will take a while as it will write random data to the disk to ensure there is no unencrypted data left on the disk from previous installations for example.
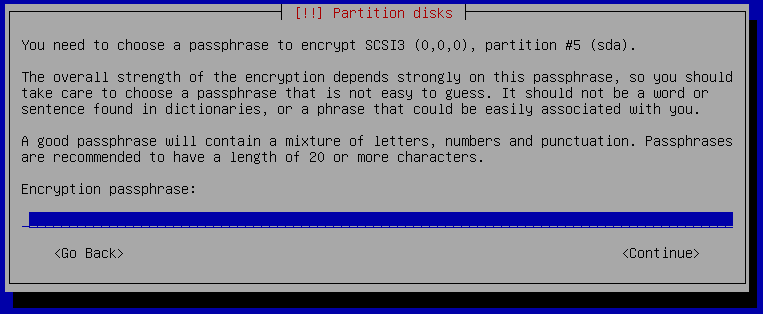
Now you need to enter your passphrase that will be used to protect the private key of the crypt volume. Choose something long enough like a sentence and don’t forget the passphrase else you can no longer access your data! Don’t save the passphrase on any computer, smartphone or password manager. If you want to make a backup of your passphrase then use a ball pen and paper and store the paper backup in a secure location.
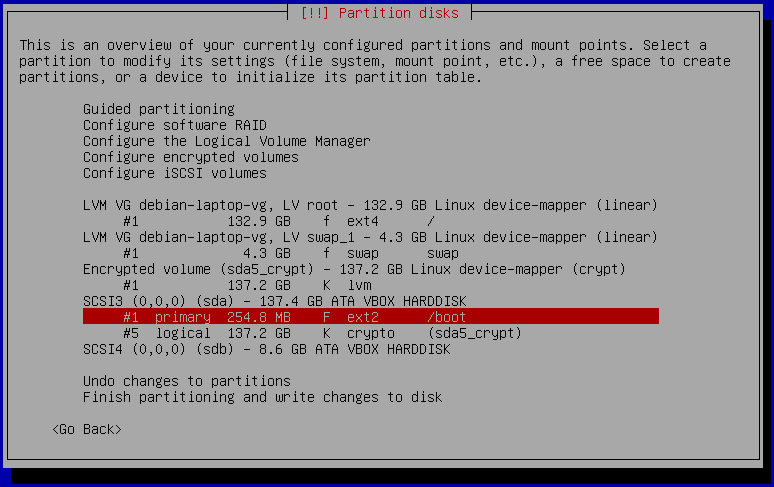
The installer will show you a summary of the partitioning as shown above but we need to make the change for the USB boot disk. At the moment it wants to put /boot on sda which is the built-in disk, while our USB stick is sdb. Select /boot and hit enter, after that select “Delete this partition”.
After /boot was deleted we can create /boot on the USB stick shown as sdb . Select sdb and hit enter. It will ask if you want to create an empty partition table. Confirm that question with yes.
The partition summary shows sdb with no partitions on it. Select FREE SPACE and select “Create a new partition”. Confirm the suggested partition size. Confirm the partition type to be “Primary”.
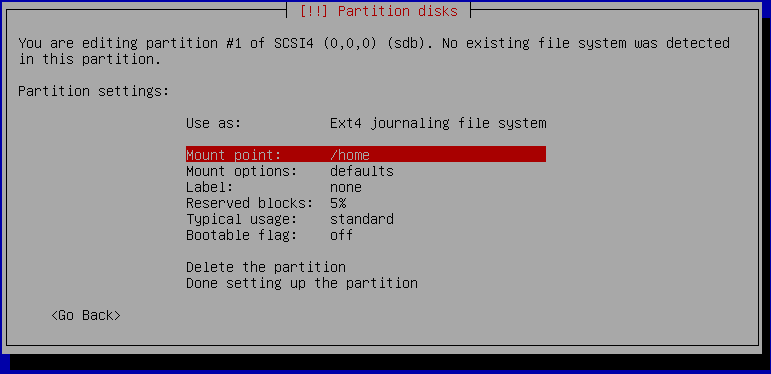
It is time to tell the installer to use this new partition on the USB stick (sdb1) as /boot partition. Select “Mount point: /home” and in the next dialog select “/boot - static files of the boot loader” as shown below:
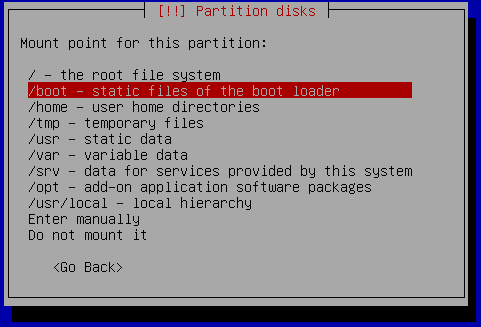
Confirm the made changes by selecting “Done setting up the partition”.
The final partitioning should look now like the following screenshot:
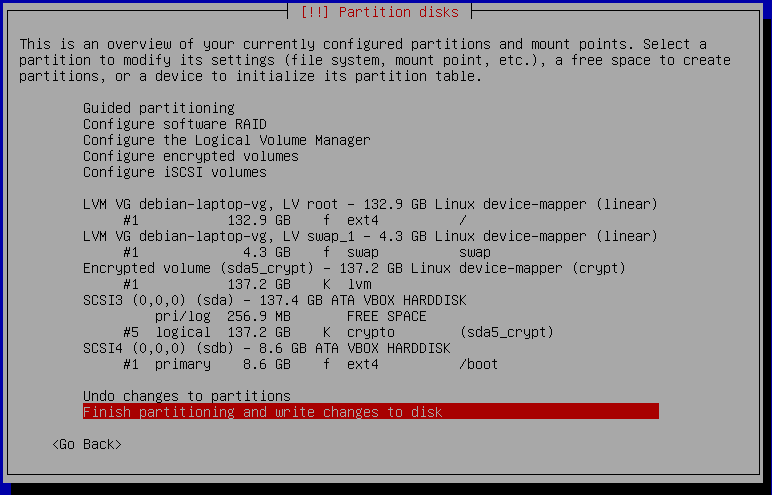
If the partition summary looks good, go ahead with the installation by selecting “Finish partitioning and write changes to disk”.
When the installer asks if it should force EFI, then select no, as EFI is not going to protect you.
Finish the installation as usual, select your preferred desktop environment etc.
GRUB Boot Loader
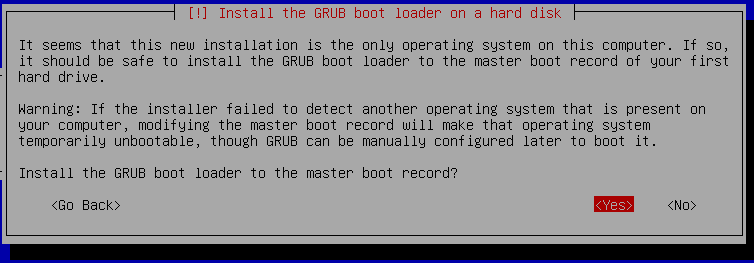
Confirm the dialog that wants to install GRUB to the master boot record. Here it is important to install it to the USB stick and not your built-in SATA/SSD disk! So select sdb (the USB stick) in the next dialog.
First Boot from USB
Once everything is installed, you can boot from your USB stick. As simple test you can unplug your USB stick and the boot should fail with “no operating system found” or similar error message from the BIOS. If it doesn’t boot even though the USB stick is connected, then most likely your BIOS is not configured to boot from USB media. Also a blank screen and nothing happening is usually meaning the BIOS can’t find a boot device. You need to change the boot setting in your BIOS. As the steps are very different for each BIOS, I can’t provide a detailed step-by-step list here.
Usually you can enter the BIOS using F1, F2 or F12 after powering on your computer. In the BIOS there is a menu to configure the boot order. In that list it should show USB disk/storage as the first position. After you have made the changes save and exit the BIOS. Now it will boot from your USB stick first and GRUB will show up and proceeds with the boot process till it will ask for your passphrase to unlock the crypt volume.
Unmount /boot partition after Boot
If you boot your laptop from the USB stick, we want to remove the stick after it has finished booting. This will prevent an attacker to make modifications to your USB stick. To avoid data loss, we should not simply unplug the USB stick but unmount /boot first and then unplug the stick. Good news is that we can automate this unmounting and you just need to unplug the stick after the laptop has finished booting to your login screen.
Just add this line to your /etc/rc.local file:
umount /boot
After boot you can once verify that it automatically unmounts /boot for you by running:
mount | grep /boot
If that command produces no output, then /boot is not mounted and you can safely unplug the USB stick.
Final Words
From time to time you need to upgrade your Linux kernel of course which is on the /boot partition. This can still be done the regular way using apt-get upgrade, except that you need to mount /boot before that and unmount it again after the kernel upgrade.
Enjoy your secured laptop. Now you can leave it in a hotel room without the possibility of someone trying you obtain your passphrase by putting a key logger in your boot partition. All the attacker will see is a fully encrypted harddisk. If he tries to mess with your crypted disk, you will notice as the decryption will fail.
Disclaimer: there are still other attack vectors possible, but they are much harder to do. Your hardware or BIOS can still be modified. But not by holding down the enter key for 70 seconds or by booting a live system.